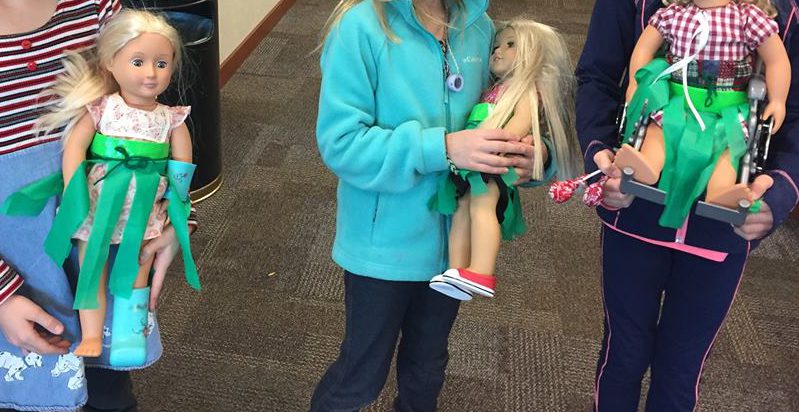
| Introduction | For my final 2018 American Girl program, I decided to go more modern girl. I actually had a young patron request that we do something with dresses, so voilà, “Fashion Show” was born. I wanted several activities to keep the kids busy. |
| Make a bracelet | Beads are a guarantee craft and the kids always love them. We have a whole bin full of beads and I just threw a bunch of string and beads out and let the kids go to town. |
| Doll Dress | The kids always go gaga for anything they can make for their dolls, and I thought a tutu in honor of the The Nutracker would be really fitting. I dug around the internet to find instructions (instructions 2) that would be the easiest for the kids. Full disclosure: adults still need to help if you have a younger crowd. I bought the fabric from JoAnn Fabric and Craft because…coupons. Rhinestones are a must. Who doesn’t want a razzle dazzle tutu.
|
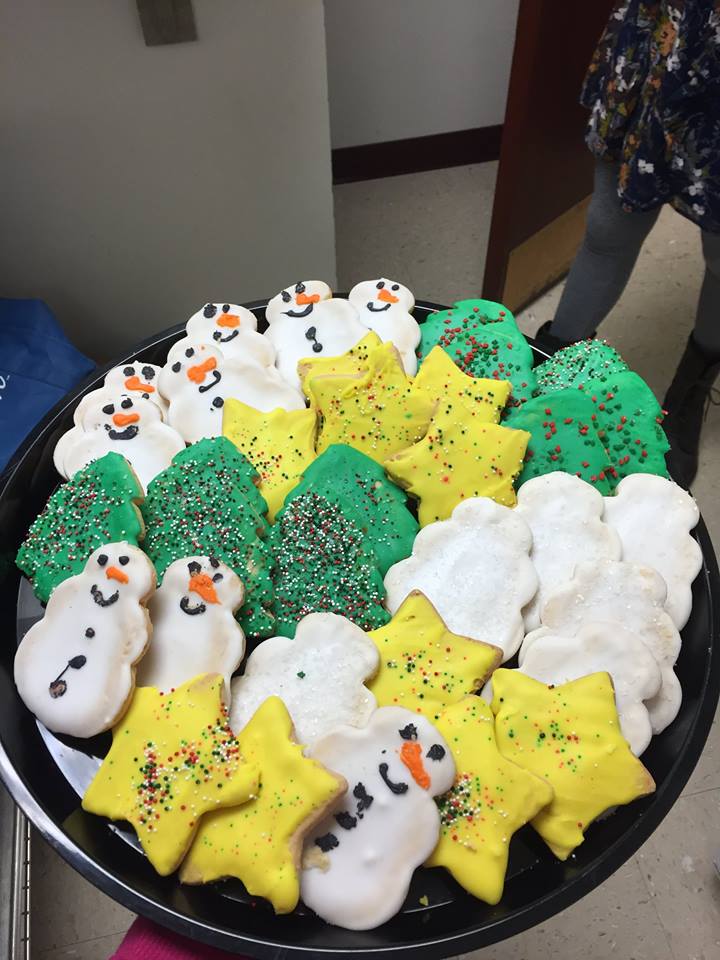
| Cookie Decoration | The holidays are not complete without your 500 cookies galore, so my super awesome coworker made me a huge batch of cookies. We kept the frosting easy and threw out a ton of sprinkles. |
| Fashion Show | Our final activity was walking the red carpet. I purchased a red carpet off of amazon and jazzed up a door with some fringe. The kids then walked the carpet while I had a volunteer act as the paparazzi to take their pictures. Our department invested in a a portable Polaroid printer. Super awesome since we can just print the pictures as we go. The kids also love that their pictures have the option to become stickers. |
| *We have pictures of the fashion show, but cropping the pictures do not do the pictures justice. |
American Girl

American Girl – Caroline Abbott
| Introduction | Caroline Abbott was one of the first dolls I ever purchased for my library and unfortunately, she is now retired from American Girl collection. Almost four years later, I FINALLY decided to do her for my program! |
| About Caroline | I really dug through Caroline’s books to get inspiration for this program. All the activities we did were directly inspired by Caroline’s books. |
| Food | Since I try and provide some food, I found that biscuits and honey would be a very easy food option. My volunteer spent most of her time in the kitchen prepping the biscuits and making sure the biscuits did not burn.
|
| First Activity | Oh, paper dolls have a special fondness in my heart, so I was excited to find the history of paper dolls in Caroline’s books. I thought my patrons would have fun making their own dolls. I found further inspiration from Thy World on affordable paper dolls. I was excited that my patrons could make boy or girl paper dolls. I had a volunteer make several clothing templates and then I put a ton of scrapbooking paper out for the participants to pick what they wanted to use. |
| Second Activity | Everyone love pockets! Unfortunately, during Caroline’s time, girls had to make “pockets” instead of having them sewn into their dresses. We simply used felt and I had a volunteer pre-poke holes to make the sewing aspect easier for the kids. This was kind of pain. However, the kids got a kick from it.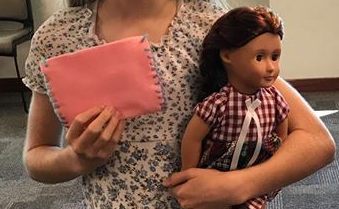 |
| Third Activity | Our last activity was embroidery. I wanted this activity to be accessible for all participants and decided to use burlap and plastic needles (real needles gave me too much anxiety). I will say the youngest kids were more meh about it because it does take time and patience, but my older kids really got into it! Rhythms of Play really broke down what I needed. |

American Girl: Luciana (February 2018)
| Overview | To kick off our 2018 American Girl program, we did Luciana Vega. I found a TON of space activities and crafts that I could do with my patrons. There were the ones I ultimately picked. |
| Introduction | First order of business was to give a quick background on Luciana and why we were going into her world this month. |
| Group Activity | Waning Moon with Oreos Who doesn’t love Oreos? This was my first thought when I was researching activities for this session. I quickly found the moon phase project.I had a powerpoint that discussed the different phases of the moon. With each phase, the kids either licked or scraped off the filling of the cookie.  This activity was on several different websites. The worksheet came from Teachers Pay Teachers. This activity was on several different websites. The worksheet came from Teachers Pay Teachers. |
| Group Activity | Star Constellations Our next activity was making a constellation out marshmallows. I guided the kids into making the big dipper. 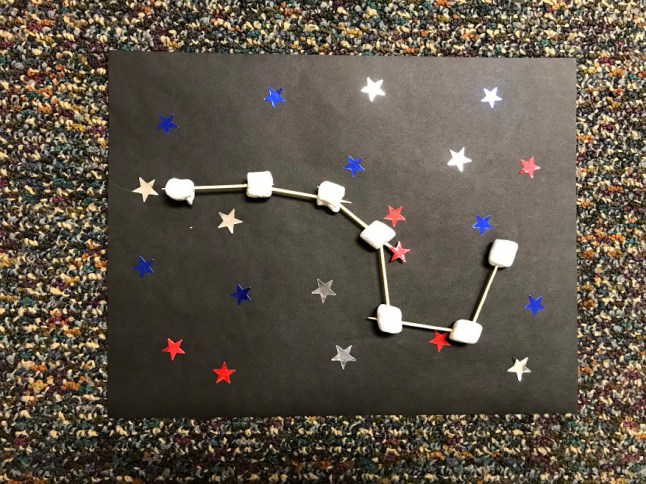 |
| Galaxy Jars | Galaxy Jars Our last activity, and by far the favorite was the galaxy jars. I set out a ton of paint for the kids to choose from. Pink and purple were the favorite of all colors. I would probably recommend skipping black paint. During the sample process, the black overtook the other colors. 
I would recommend writing out the rules, so the adults know the exact order on how to do the jars. I spent a good amount of time reiterating the sequence. The second advice is not the SHAKE the jar, but rather, swirl it enough to mix the colors. |
| Passive Activity | Moon Walk Our last activity was a moon walk replication. I bought some car sponges and had the kids attach it to their feet. I strongly recommend buying the thickest sponges for this activity. I unfortunately bought thinner ones, so the kids had to stack multiple sponges for their walk.   |

American Girl: Nanea (October 2017)
American Girl Nanea was a super simple program but so fun to do!
I did my typical opening. I talked about where Nanea lived (Hawaii) and two popular items in Hawaiian culture. The first one was Mochiko. I talked about the cake’s origins and bit about how it is made. I then had everyone split into two groups, as we were going to make our own Mochiko.
I had everything laid out on the tables.

Then every child helped with making the cake.


This was the most time-consuming portion. This ate up almost the entire first hour. After I had everyone’s pans, I was able to put them in the oven.
While we waited for the mochiko to bake, we made leis. I talked about the history and etiquette of the lei. I then guided the kids into making their own lei. This were the instructions I used.


By the time everyone was done with their leis, our cake was ready!

American Girl: Earth Day
Our one and only American Girl program for spring happened to land on Earth Day. I felt that it was only appropriate to do a Modern Girl session by upcycling crafts that I already had around the children’s department. You can find a TON of activities to do for this kind of program. I had to limit myself to four of them. This program was also very loosely structured compared to my other American Girl programs.
Our first craft: CDs/DVDs
Supply cost: $0
I wanted something other than a mobile for a CD project. Researching, I found several sites where people painted CDs with black acrylic paint and then etched a design into them. As a library, we have a whole bin of old CDs and paint is always to be found. We used push pins as our etching tools, as I wanted the little hands to have some sort of handle on their utensil for etching. I would say to remind people that this is a time consuming project. It takes patience to etch away the black paint. I also think the older participants and adults enjoyed this activity more than my younger participants.


Second Craft: Batik Paper
Supply Cost: $0
I found this craft idea in Make Your Own Crafts: Eco-Crafts by Sally Henry and Trevor Cook. All you need is either coloring sheets or plain paper (I used scrap paper), crayons, water-based black paint, and paper towels.
My participants colored a picture of their choice or drew their own design with crayons. The trick is to really color the entire paper and to color heavily. Once they finished coloring, the kids crumbled up their papers into a tight ball and re-smoothed it out. Once it was flat again, the kids then painted over their picture with the water-based paint. We had to water down our paint because it was a tad thick. If the paint is too watery, you can mop up the excess with a towel.
We covered each picture with another piece of paper and then carefully placed the iron on top of the clean paper for a second. We would lift up the iron and press it on a new section. DO NOT IRON the paper or leave it on for too long. It will make the papers stick together. Once you have applied the heat pull apart the two papers.
This was a favorite among the participants. I actually had several adults ask to see the book, so they could get the instructions to do at home.


Third Craft: Chalkboard Tins
Supply Cost: $1.98
We had a patron who donated mini Altoids tins to our library. My co-worker originally was going to use them, but she graciously donated them to me for my program. I also had chalkboard paint. I only needed to buy the chalk for the kids.
This was the clear winner for the kids. All they had to do was paint the inside of their tin. Ideally you would allow the tin to dry for a few hours and then paint another coat. We didn’t have that kind of time, so we would let the tins dry for about 20-30 minutes and then apply another coat. Some of the tins did have quite a bit of paint from some overenthusiastic painters, but it all worked out. Instructions can be found here.

My last craft I unfortunately do not have a picture of it. One of my volunteers found wooden flowers of varying sizes. She created little baggies that contained one colored Popsicle stick, one big flower, and one little flower. The kids (really an adult) hot-glued them together.
I think the next time I do this program I would like to incorporate making dirt cups. I just was a leery of how much time I would have for everything.
American Girl: Molly McIntire (October 2016)
This was my last American Girl Program for 2016, and I really wanted to do something extra special. I brainstormed for several weeks and realized that Molly allowed me to incorporate the holidays from October-December into the program. I also was afforded the opportunity to pair with my one of my coworkers to provide a special element with her own organization.
The Set-Up:


The Plan:
I thought because of Molly’s father being in the military during WWII it would be perfect for my participants to write letters and draw pictures for the military overseas. My coworker runs a Book For Soldiers (but sends out to all branches of the military), and I said I would have my people write their letters/pictures and she can put them in the care packages for the Winter Holidays!
We also made up some goody bags! For majority of the year, she cannot send chocolate out, so we made sure to include chocolate.

The second part of the program was for the participants to make their own hulu skirts in honor of Molly’s own hulu skirt for Halloween. We talked about how during WWII many kids resorted to making their own costumes.

I found instructions at this site. I kept it fairly simply. I figured since Molly’s skirt was green then our skirts should be green!

Snack:
I found out that kids ate doughnuts and tootsie pops during Molly’s time. We also had Apple Cider, since Molly had Apple Cider during her Halloween!
American Girl: Voting (March 2016)
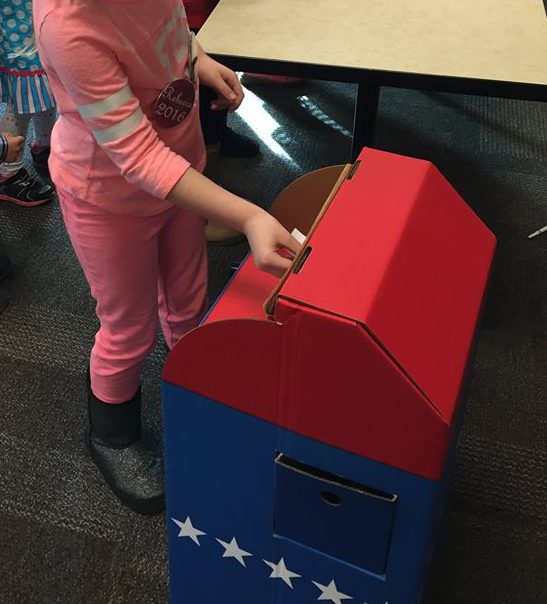
March was Women’s History Month and I thought it was only right to celebrate with having our own mock election. This was a double whammy as the United States is also in the midst of gearing up for the presidential election in November. I thought it would be neat to give my participants a tiny taste of what goes into voting. I definitely steered clear of using any of the potential candidates. Instead I picked Rebecca and Samantha as our candidates. I thought it was appropriate to use these two American Girls, as they were both alive when women received the right to vote.
For my set-up, I changed it up from the normal pods. I instead made two long tables and assigned participants to a specific party. Rebecca was the purple party, and Samantha was the pink party. I did this because I did not want a specific party to have way more people than the other party.

Once everyone was assigned to a table, I did a mini lesson about why women didn’t have the right to vote and how they eventually gained the right to vote. I then explained that the two parties were going to campaign for their doll. I explained that while they would campaign for one doll they could always vote for the other doll. My chosen activities were Campaign placards and buttons. They could also make mini buttons!
![IMG_1631[1]](https://librionyian.com/wp-content/uploads/2016/05/img_16311-e1464119513607.jpg?w=646)


While they were making their buttons and signs, I placed Samantha and Rebecca books on their respective campaign tables. I said once they were done to start researching their girls a little bit. I did have a power point that listed what each girl stood for, what they had accomplished, and their goals in life. We then had all the kids line up and they could say why people should vote for their doll. Some of the promotions were:
She is pretty.
She is nice.
She likes to help others.
She taught her friends to read.
She helped the laborers.
Afterwards, we had everyone vote.

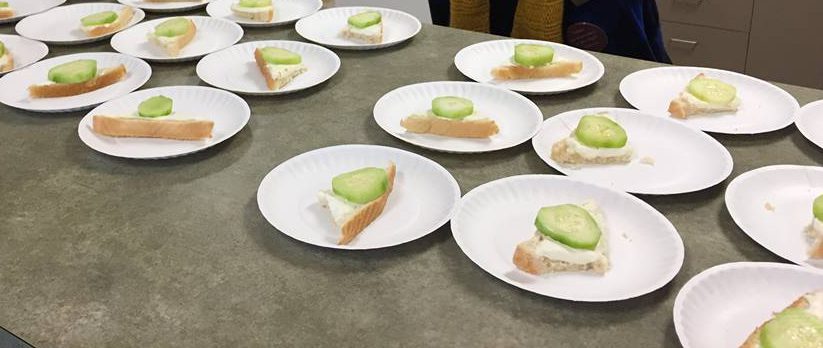
While we counted the ballots, we fed them cucumber sandwiches and pink lemonade. Very reminiscent of the time.
Our winner……

American Girl: Lea Clark (February 2016)
We kicked off 2016 with the girl of the year, Lea Clark.
Our chosen activities were:
- Photography
- Picture Frames
- Destination Door Hangers
Since Lea Clark is big into taking pictures, we wanted to give our participants the opportunity to flex their own photography skills. Unfortunately, we only had one bona fide camera, so we opted to also use the camera in the ipads. My helper would take a group of three girls out around the library for about 5 minutes and give them the chance to take pictures of things they liked. We would then upload their pictures to the computer and have them pick their favorite picture. About a week later I had printed off all their pictures. Warning: this activity is very time consuming and we did run about 10 minutes over.
Here are a few of the shots the kids took:


While the kids rotated out for pictures, the other half of the kids worked on their picture frames and destination door hangers. Obviously, the picture frame was meant to house their awesome pictures, but the door hanger let them show off their collage skills. We had grabbed a bunch of magazines that showcased fashion, travel, and animals. They could put on their hangers where they would travel, what they would pack, and what they would see.


Our snack was Brigadeiro! I had a blast making this Brazilian delicacy. You can either eat it when it is goopy hot, more like a caramel, or like a truffle. I was not comfortable with making it as a truffle, so I went more for more a caramel. I used the recipe from allrecipes.com but did some research. It is recommended that you use a Nestle chocolate instead of the unsweetened chocolate. The Odyssey Online gave a great outline with pictures on how to make this delicious treat!
American Girl: Maryellen Larkin (December 2015)
Sigh, our last American Girl for 2015 was Maryellen Larkin. I thought it would be appropriate to include her for one of our 2015 sessions, as she is the newest Beforever Doll. I immediately decided to do a 1950s Christmas. I knew that poodle skirts were essential and since Ms. Larkin wanted snow, we would give her snow.
After our traditional powerpoint, we started on the poodle skirt and scarves. I knew this would take longer and wanted the kids to start immediately. I thankfully saved time by having all the felt already cut. The instructions called for a felt poodles, but I didn’t have the time to really cut out 30 plus poodles and went with snowflakes, flowers, and hearts. Thank you die-cut machine!
The girls were each were handed a skirt and scarf. Then each girl got to pick up to five felt pieces to go with their skirt and scarf. The longest portion of this session was the glue gun. I really do not allow the girls to handle the glue guns (I don’t want to explain to a parent how their child got a burn blister), so I rely quite a bit on the adults to assist. I also only had a limited amount of glue guns. I did fix this for future dates.

Once their felt pieces were glued down, the girls then got to wrap their skirts and scarves for Christmas! I had three different Christmas wrapping paper out. I wasn’t sure if they would like this portion, but they loved it.

I was told by several parents/guardians that their girls were very excited to put their presents under the tree and were just as excited to open them on Christmas Day.
The second activity was snowflakes. Never doubt how much fun kids have making snowflakes out of paper. To throw in some extra excitement, I also did glitter! You either hate glitter or you embrace it! I embrace it and the more the merrier.


The final portion of this session was cookies! I ordered Christmas cookies from a local bakery and made lemonade. It was a great way to end 2015.
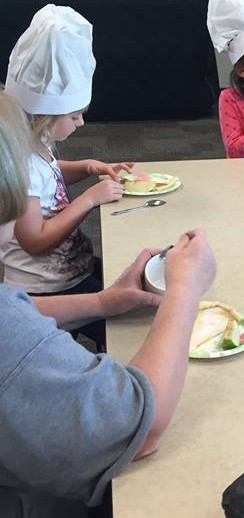
American Girl: Grace Thomas (November 2015)
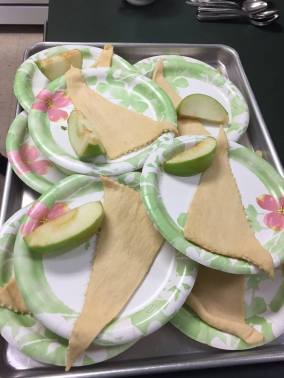
I decided to change up my program for the month of November to incorporate a session for the girl of the year, Grace Thomas. I knew the kids would get a kick out of cooking, so I searched online for easy recipes for this specific program. Here is what we did:
No cooking program should ever be complete without a chef’s hat! I gave the kids the option of making the chef hat for themselves or their dolls. Most of the kids picked making the chef’s hat for the doll. This is where I got the instructions for our hats.

![IMG_0948[1]](https://librionyian.com/wp-content/uploads/2015/12/img_09481.jpg?w=225&h=300)
My hat turned out ok.
After we made our hats we moved on to our apple pie crescent rolls. Everyone became super excited for our first recipe. I do recommend going heavier on the sugar and doing a test at home to figure out what works.
Our last activity was ice cream in a bag. This one was a bit trickier. I did a test run at home and everything went well. However, once at the library, the bags we were using kept leaking! I literally have no pictures from this segment because I was running around getting new bags to put the leaking bags into.
This month’s activity was super fun but exhausting.